
Key takeaways
- Type: neck / shoulder strap with quick-release hardware at the body end
- Included: main strap, quick-release connector, separate safety tether
- Material class: woven webbing with a sliding shoulder pad; metal or reinforced-polymer hardware
- Weight class: roughly 100–160 g including hardware — light enough not to notice, heavy enough to feel secure
- Fits: standard DSLR strap lugs; check whether your body uses fixed lugs, split rings or a slot before ordering
- Load class: comfortable with an APS-C body and zoom, and with most full-frame bodies and standard zooms; a pro body plus a long telephoto is beyond what any neck strap should carry
The best overall pick in this roundup is the waka Rapid Camera Neck Strap with Quick Release and Safety Tether. It is the cheapest change that reliably gets a DSLR out of the bag more often, and it suits anyone carrying an APS-C or full-frame body with a standard zoom who wants to move between neck carry and a tripod without unthreading anything. The JJC Camera Rain Cover Sleeve 2-pack is the best budget pick, sized for a DSLR with a lens up to 18 inches long. The K&F Concept 64 inch/163 cm Lightweight Aluminum Travel Tripod is the best premium pick and the piece of support gear most travel shooters keep for a decade.
That order is deliberate. Searching for the best DSLR camera deals usually means watching body prices, and body prices are the least stable number in photography — a model that is mid-range in January can be a bargain in June and discontinued by autumn. Accessories barely move at all. So this guide does two jobs. First, it sets out the criteria that decide whether a discounted DSLR is genuinely a good deal: sensor format, autofocus system, lens ecosystem, burst speed, video capability, battery life and beginner-friendly controls. Second, it covers nine accessories that turn a deal on a body into a working kit, because a body with no strap, no bag, no support and no protection is not a saving — it is a camera sitting on a shelf.
Top 3 Picks
Best Overall: waka Rapid Camera Neck Strap with Quick Release and Safety Tether
The waka strap wins because it solves the two problems every DSLR owner hits in the first month: the stock strap is uncomfortable, and switching between handheld and tripod use means fiddling with a buckle under a loaded camera. Quick-release hardware at the body end plus a separate safety tether means the camera can come off in a second, and if the release ever fails, the tether is still attached. It suits a mid-weight body with a kit zoom, which is what most first DSLR buyers end up carrying.
Best Budget: JJC Camera Rain Cover Sleeve for DSLR with Lens up to 18″, Waterproof, 2-Pack
Weather protection is the accessory people skip and then regret. This two-pack costs less than most single covers and fits a DSLR with a long lens attached, so it covers both a short kit-zoom setup and a telephoto setup from the same box. It suits anyone who shoots outdoors on a schedule — sport, wildlife, events — where “it might rain” is not a reason to stay home.
Best Premium: K&F Concept 64 inch/163 cm Lightweight Aluminum Travel Tripod
A tripod is the one accessory that changes what images are possible rather than just how comfortable the process is. The 163 cm / 64 inch aluminum travel model reaches a working height that suits most standing shooters without a centre-column stretch, folds down for a carry-on, and is built from a material that tolerates being knocked around in a car boot. It suits travellers, landscape shooters and anyone doing long exposures or product work at home.
Quick Comparison
Every product in this guide appears in the table below. Prices are given as tiers rather than figures because accessory listings change constantly and a tier is the part that stays stable.
| Product | Best for | Key specs | Price tier |
|---|---|---|---|
| waka Rapid Camera Neck Strap with Quick Release and Safety Tether | Fast switching between handheld and tripod carry | Neck strap; quick-release connector; separate safety tether; woven webbing with sliding pad | Mid-range |
| K&F Concept 64 inch / 163 cm Lightweight Aluminum Travel Tripod | Travel, hiking and long exposures where packed size matters | Aluminum legs; 64 in / 163 cm maximum height; travel-class folded length; ball head class | Premium |
| K&F CONCEPT 75″ Aluminum Camera Tripod | Tall shooters, studio work and landscape | Aluminum legs; 75 in maximum height; lightweight and compact travel claim; ball head class | Mid-range |
| K&F CONCEPT Camera Sling Bag Small Crossbody Case | One body, one or two lenses, fast access | Sling / crossbody single-shoulder design; quick side access; padded camera compartment | Mid-range |
| JJC Camera Rain Cover Sleeve for DSLR with Lens up to 18″ | Wet-weather and dust protection | Waterproof sleeve; fits DSLR with lens up to 18 in; supplied as a 2-pack | Budget |
| MOSISO Camera Backpack, DSLR/SLR/Mirrorless Photography Camera Bag | Commuting and day trips with a laptop | Backpack form; padded dividers; DSLR / SLR / mirrorless fit; laptop-sleeve class | Premium |
| CADeN Camera Backpack Bag Professional | Larger kits, air travel and tripod carry | Backpack form; DSLR / SLR / mirrorless compatibility; water-resistant construction claim | Premium |
| WANBY Camera Strap Canvas Black Shoulder Strap with Quick Release Buckles | Classic low-cost neck carry | Canvas shoulder strap; quick-release buckles; black webbing finish | Budget |
| MBJRFU Camera Lens Cleaning Kit | Routine lens and body maintenance | Lens paper; air blower; cotton swabs; cleaning solution; mirrorless and DSLR safe | Budget |
How We Chose
Selection started from the listing itself, not from brand reputation. Each product had to state clearly what it fits — a lens length, a body type, a mounting standard — because an accessory that “fits most cameras” usually fits none of them well. From there, four criteria decided inclusion.
Specification fit. Published dimensions, maximum heights, lens clearances and material claims had to be specific enough to compare against other options in the same category. Where a listing is vague about a measurement, this guide says so and describes the spec class instead of guessing a number.
Category necessity. Every pick here answers a problem that appears in the first year of DSLR ownership: carrying the camera comfortably, supporting it, protecting it from weather, storing it, and keeping glass clean. Nothing on the list is a novelty.
Use-case match. Products were assigned to the reader they actually suit rather than ranked on price. A sling bag and a full backpack are not better and worse versions of each other; they serve different days.
Upgrade path. The strongest picks stay useful as a kit grows. A tripod rated well above the weight of an entry-level body will still hold a full-frame camera and a telephoto zoom, and a strap with a removable tether still works when you add a second body.
Judgements are based on manufacturer-published specifications, category conventions and the well-documented failure points of each product type. No claim here rests on bench measurements, teardown analysis or ownership of the items.
1. waka Rapid Camera Neck Strap – Best for Quick-Release Everyday Carry

waka Rapid Camera Neck Strap with Quick Release and Safety Tether
Included for 'Best DSLR Camera Deals' as a relevant option in this category; details come from the product listing.
View on AmazonThis is the accessory that changes behaviour rather than specifications. A DSLR with a kit zoom is heavy enough that the factory strap becomes a genuine reason to leave the camera at home, and the factory strap is also the reason people avoid swapping between handheld and tripod work. The waka strap addresses both: a wider, padded shoulder section spreads the load, and quick-release hardware at the body end lets the camera detach in seconds without disturbing the strap around your neck.
Key specs
- Type: neck / shoulder strap with quick-release hardware at the body end
- Included: main strap, quick-release connector, separate safety tether
- Material class: woven webbing with a sliding shoulder pad; metal or reinforced-polymer hardware
- Weight class: roughly 100–160 g including hardware — light enough not to notice, heavy enough to feel secure
- Fits: standard DSLR strap lugs; check whether your body uses fixed lugs, split rings or a slot before ordering
- Load class: comfortable with an APS-C body and zoom, and with most full-frame bodies and standard zooms; a pro body plus a long telephoto is beyond what any neck strap should carry
Why the safety tether matters
Every quick-release system on the market shares one failure mode: the release itself. A lever gets knocked, a latch wears, a connector is not fully seated, and a camera lands on concrete. A tether is a second, passive connection that carries no load in normal use but takes over if the primary release opens. It is the difference between a system you trust and a system you keep checking. On the waka strap the tether is part of the design rather than an aftermarket addition, which means the attachment points and the lengths are already matched.
Carrying behaviour in practice
The shoulder pad slides, so the camera can be parked high on the chest for walking or dropped to the hip for standing around. Woven webbing is the right material choice here — it resists the stretching and fraying that flat nylon webbing develops at the lug, and it dries faster than leather after a wet shoot. Hardware is the part that determines whether the strap feels expensive or cheap, and in this class you are looking for a release that seats with a distinct click and does not rattle against the body.
Where it fits in a kit
Anyone who shoots with one body and one or two lenses gets the full benefit. If you regularly switch to a tripod, the release saves real time on every setup — over a hundred shooting sessions a year, that adds up to hours. If you carry two bodies, two straps with the same release system let you swap the pad between them. If you shoot almost entirely from a tripod, this is not the accessory you need first.
Pros
- Quick release at the body end makes handheld-to-tripod changes a one-second job
- Safety tether provides a genuine back-up rather than a marketing feature
- Padded sliding shoulder section distributes weight across the shoulder rather than the neck
- Woven webbing resists stretching and dries quickly
- Stays useful when a second body or a heavier lens joins the kit
Cons
- Quick-release hardware adds bulk and weight at the camera lugs
- Metal hardware can rattle against the body when walking
- Release mechanisms require periodic checks — a loose or worn latch is a real risk
- Costs noticeably more than a plain webbing strap
- Not the right answer if you shoot entirely from a support
Compared with the WANBY canvas strap
The WANBY strap is the cheaper alternative in this list and it does one thing well: it carries a camera over the shoulder for a low cost, with quick-release buckles at the ends. What it does not include is a separate safety tether, so the release hardware is the only connection. If you want the classic canvas look and the lowest possible outlay, WANBY is the sensible buy. If you have ever watched a camera drop, or you simply want the redundancy, the waka strap is worth the step up — and its sliding pad is better suited to a heavier body over a long day.
2. K&F Concept 64 inch/163 cm Lightweight Aluminum Travel Tripod – Best for Travel and Long Exposures

K&F Concept 64 inch/163cm Lightweight Aluminum Travel Camera Tripod
Included for 'Best DSLR Camera Deals' as a relevant option in this category; details come from the product listing.
View on AmazonA tripod is the only accessory in this guide that expands what you can photograph rather than how comfortably you photograph it. Long exposures, night scenes, waterfalls, fireworks, product shots, family group photos that include the photographer — none of these happen reliably handheld. The K&F Concept 64 inch / 163 cm aluminum travel tripod sits in the sweet spot for most enthusiasts: tall enough to stand behind without raising a centre column, and short enough when folded to travel.
Key specs
- Maximum height: 64 in / 163 cm — a working height that suits most standing shooters
- Material: aluminum legs, which trade a little weight for stiffness and cold-weather durability compared with carbon fibre
- Folded length: travel class — designed to pack into a carry-on or strap to the outside of a daypack
- Head: ball-head class, which is the right choice for stills and quick repositioning
- Leg sections: multi-section design; more sections mean a shorter folded length and slightly longer setup
- Load class: comfortably supports a DSLR with a standard zoom, and most full-frame bodies with moderate telephotos
Why 163 cm is the number that matters
Maximum height is the specification buyers ignore and then complain about. If a tripod tops out below eye level, you either hunch or you raise the centre column, and a raised centre column is the least stable part of any tripod — it turns a rigid three-legged platform into a monopod on a stick. A 163 cm maximum height means a standing photographer of average build can frame through the viewfinder without extending the column. For landscape work, where you often want the camera at chest height or above, that headroom is the difference between a sharp frame and a soft one.
Aluminum versus carbon fibre
Aluminum is heavier than carbon fibre and it transmits vibration differently, but it is stiffer for the money, tolerates being knocked against rocks, and does not develop the splintering that carbon can suffer after impact. For a travel tripod that will spend its life strapped to a bag or rattling in a car, aluminum is a defensible choice. The trade-off is carried weight, which matters most on multi-day hikes and least on road trips and studio work.
Ownership realities
Three things wear first on any tripod. Leg locks are number one: twist locks rely on internal friction collars that eventually slip, and flip locks rely on a cam that can loosen. The second is the rubber feet, which harden and fall off after a few seasons of pavement and rock. The third is the head’s panning base, which develops play if it is overtightened. All three are cheap to fix and easy to check before a trip — extend every section, load the camera, and confirm nothing creeps. A quick-release plate that is not fully seated is the most common cause of a camera falling off a tripod, so check the plate screw with a coin before every session.
Pros
- 163 cm maximum height allows eye-level framing without extending the centre column
- Aluminum construction is stiff, impact-tolerant and cold-weather reliable
- Travel-class folded length fits carry-on luggage and daypack straps
- Ball head suits stills, quick repositioning and portrait-to-landscape flips
- Enables long exposure, night and self-portrait work that is impossible handheld
- Load capacity leaves room for a future full-frame upgrade
Cons
- Heavier to carry than an equivalent carbon-fibre tripod
- Multi-section legs take longer to deploy than a three-section design
- Ball heads need practice before they feel quick, especially with heavy lenses
- Leg locks, feet and head play are wear items that need occasional attention
- Premium tier pricing — it costs more than a basic aluminum tripod that would hold the same camera
Compared with the K&F CONCEPT 75″ tripod
The 75 inch model is the taller sibling and it is cheaper. If you are tall, if you shoot on uneven ground, or if you work in a studio where packed length is irrelevant, the extra height is a genuine advantage and the mid-range price is the better deal. The 64 inch model wins on travel: it folds smaller, which is the entire point of a travel tripod, and it is the one you will actually put in a bag. Buy the 75 inch if the tripod lives indoors or in a car; buy the 64 inch if it flies.
3. K&F CONCEPT 75″ Aluminum Camera Tripod – Best for Tall Shooters and Studio Work

K&F CONCEPT 75" Aluminum Camera Tripod, Lightweight and Compact for Travel
Included for 'Best DSLR Camera Deals' because the listing specifies Lightweight and Compact for Travel, details this guide uses to compare options.
View on AmazonHeight is a personal specification. A photographer over six feet tall will find a 60 inch tripod unusable for anything but kneeling work, and the K&F CONCEPT 75 inch aluminum tripod answers that directly. It is the practical choice for tall shooters, for anyone working on slopes where one leg has to be extended further than the others, and for studio or home setups where the tripod never leaves the room and folded length does not matter.
Key specs
- Maximum height: 75 in — among the tallest options in this price class, aimed at standing eye-level work
- Material: aluminum, chosen for stiffness and durability over minimum weight
- Design claim: lightweight and compact for travel, though the height advantage is the headline feature
- Head: ball-head class, suitable for stills and fast repositioning
- Load class: supports a DSLR with standard zoom and most full-frame bodies with moderate telephotos
- Best environment: studio, events, landscape from a vehicle, uneven ground where leg extension varies
The case for a tall tripod
Most photographers underestimate how much height they need. A tripod that reaches chest height forces you to bend for every framing decision, which is tolerable for a ten-minute shot and miserable for a two-hour session. More importantly, tall tripods handle terrain better: on a slope, the downhill leg may need six extra inches just to bring the head level, and a tripod already near its maximum has nothing left to give. The 75 inch model removes that constraint, and it does so at a mid-range tier rather than the premium price of the shorter travel model.
Stability at height
A tall tripod is only useful if it is stable when extended. The rules are the same across brands: extend the thickest leg sections first and the thinnest last, keep the centre column down unless you have no alternative, hang a bag from the centre hook to add mass, and avoid extending the lowest sections on soft ground without pressing the feet in. Aluminum helps here because its mass is concentrated low in the legs, and the rubber feet grip better on rock and pavement than plastic ones. In wind, the practical fix is a weight bag rather than a heavier tripod — a couple of kilograms hung from the centre column does more than any material upgrade.
What to check before buying
Confirm the folded length if you plan to travel with it, because a 75 inch tripod is rarely a carry-on item. Check the head’s maximum load against your heaviest realistic combination — a body, a battery grip and a telephoto zoom add up faster than people expect. And check the plate system: if you already own plates from another brand, an incompatible head means buying new ones. The quick-release plate standard is the single most annoying thing to get wrong in the tripod world.
Pros
- 75 inch maximum height suits tall photographers and sloping ground
- Mid-range tier pricing for a very tall aluminum tripod
- Aluminum legs are stiff, impact-tolerant and unaffected by cold
- Plenty of height headroom for portraits, events and landscape
- Ball head allows fast switching between orientations
- Works well as a permanent studio or home-office support
Cons
- Longer folded length makes it awkward for carry-on travel
- Aluminum weight is noticeable on a long walk
- At full extension, stability depends heavily on technique and centre-column discipline
- Leg locks and feet remain wear items over several seasons
- More tripod than a casual shooter needs
Compared with the K&F Concept 64 inch travel tripod
These two are separated by purpose, not quality. The 75 inch model gives you 11 extra inches of height and a lower price; the 64 inch model gives you a shorter packed length and a premium build. If your shooting happens near a car or indoors, the taller, cheaper tripod is the smarter purchase. If your shooting happens after a flight, a train and a two-hour hike, the shorter one earns its premium every trip. Nobody regrets buying the tripod they actually carry.
4. K&F CONCEPT Camera Sling Bag Small Crossbody Case – Best for Fast-Access Single-Body Carry

K&F CONCEPT Camera Sling Bag Small Crossbody Case
Included for 'Best DSLR Camera Deals' as a relevant option in this category; details come from the product listing.
View on AmazonMost DSLR owners end up with two bags eventually: a large one for travel and a small one for everything else. This sling is the second bag. It carries one body with a lens attached plus a spare lens, a battery and a card, and it rotates from back to chest without being taken off, which is the entire reason sling designs exist. It suits street shooters, event photographers, parents photographing their own children, and anyone who wants the camera available rather than packed away.
Key specs
- Form: sling / crossbody, worn over one shoulder and diagonally across the back
- Access: swings to the front for side or top opening without removing the bag
- Capacity class: one DSLR or mirrorless body with a lens attached, plus one spare lens and small accessories
- Protection: padded camera compartment with dividers; a rain-resistant shell is typical of this class
- Carry position: can be worn on the back for walking and rotated to the chest for shooting
- Best body size: APS-C DSLRs and smaller full-frame bodies; a pro body with a battery grip will be tight
Why one shoulder is sometimes right
A backpack distributes weight better, but it has to come off to be opened, and that is a real cost when you are shooting. A sling keeps the camera reachable, keeps both hands free for walking, and keeps the bag on your body in crowds. The trade-off is asymmetric loading — several hours with a heavy kit on one shoulder will make itself known. For a two-hour walk with one body and one lens, that trade is worth making.
Packing it well
Two rules keep a sling usable. First, put the body with the lens attached in the main compartment with the lens pointing down or sideways, not up, so the weight sits at the bottom of the bag. Second, keep the spare lens in a divider pocket that does not press against the mounted lens. The most common mistake is over-packing: a sling that is full cannot rotate smoothly, and a sling that cannot rotate is just an uncomfortable shoulder bag. If you need a laptop, a second body and a tripod, this is the wrong bag — look at the backpacks below.
Ownership realities
On soft bags, the zips wear first, especially the main access zip that is opened dozens of times a day. YKK-class zippers and a zip that runs around a corner rather than a straight edge last longer. Next is the padding, which compresses at the shoulder strap and the back panel after a year or two of regular use — the bag still works, it just feels thinner. The shell fabric is rarely the failure point; seams and strap attachment points are, so check the stitching where the shoulder strap meets the body of the bag. Dividers are the cheapest thing to replace and the most common to lose.
Pros
- Rotates from back to chest for immediate camera access
- Keeps both hands free while walking
- Small footprint in crowds, on public transport and in restaurants
- Padded camera compartment with adjustable dividers
- Mid-range price for a bag that gets used daily
- Good complement to a larger backpack rather than a replacement for one
Cons
- Single-shoulder loading becomes uncomfortable with a heavy kit over long periods
- Limited capacity — no laptop, no second body, no tripod
- Rotation gets stiff when the bag is over-packed
- Main access zip is a wear point with heavy daily use
- Less protection than a rigid-shell backpack for air travel
Compared with the MOSISO and CADeN backpacks
The backpacks in this list carry more, protect more and distribute weight better — and every one of them must come off your back before you can reach a camera. That single difference decides the choice. If your typical outing is one body, one lens and two hours on foot, the sling will be the bag you reach for. If your typical outing involves a laptop, two lenses, a flash and a tripod, the sling will frustrate you within a week. Many photographers end up owning both, and that is not indecision; it is two different jobs.
5. JJC Camera Rain Cover Sleeve for DSLR w/Lens up to 18″, Waterproof, 2-Pack – Best Budget Weather Protection
Weather protection is the most commonly skipped accessory and the one with the clearest return. A DSLR is not waterproof, and the places people most want to photograph — coastlines, mountains, festivals, sport — are exactly the places where rain, spray and dust appear. This JJC sleeve covers a DSLR with a lens up to 18 inches long, and it comes as a two-pack, which means you can keep one in the bag and one in the car, or use one for a short lens setup and one for a telephoto without swapping.
Key specs
- Type: pull-over rain cover sleeve for a camera with lens attached
- Lens clearance: fits a DSLR with a lens up to 18 inches — long enough for a telephoto zoom
- Weather claim: waterproof construction
- Quantity: supplied as a 2-pack
- Access class: typically designed with a clear window or opening for the viewfinder and controls; confirm the exact arrangement on the listing
- Fits: DSLR bodies with a lens mounted; check the length of your longest lens against the 18 inch figure
Why 18 inches is the useful number
Most cheap covers are sized for a body with a short zoom and become useless the moment a telephoto goes on. An 18 inch sleeve covers a body plus a long lens, which is precisely the combination you are using when the weather turns and you cannot stop shooting. If your longest lens is a compact kit zoom, the cover will simply be roomy — that is not a problem, since a loose cover still keeps water off the body and can be gathered around the lens hood.
How to use a rain cover properly
A rain cover fails for predictable reasons. The most common is condensation: seal a warm camera inside a waterproof sleeve on a cold, wet day and moisture forms inside the bag as the camera cools. The fix is to let the camera acclimatise before covering it, and to avoid sealing it completely when you are moving between warm and cold environments. The second mistake is covering the lens hood opening; water then runs onto the front element. The third is storing the cover wet — a sleeve left damp in a bag develops mildew and starts to smell, which is a good reason the two-pack is useful: one can dry while the other is in use.
Ownership realities
Coated fabric and taped seams are what make a cover work, and both degrade. Seams are the first thing to fail, particularly at the corners where the fabric folds repeatedly. Wipe the cover down and let it dry fully before folding it; folding a wet cover along the same crease every time will eventually crack the coating along that line. Covers are also a consumable in the sense that they are cheap enough to replace rather than repair — which is another argument for buying a two-pack at a budget tier instead of a single premium cover.
Pros
- Fits a DSLR with a lens up to 18 inches, covering telephoto setups as well as kit zooms
- Two covers in one purchase — one for the bag, one for the car or a second setup
- Budget tier price makes it easy to keep a spare permanently in the kit
- Protects against rain, sea spray, dust and sand as well as water
- Small and light enough to carry on every outing
Cons
- Access to controls and the viewfinder is more awkward than shooting uncovered
- Condensation risk if a warm camera is sealed inside on a cold day
- Taped seams and coating degrade with repeated folding
- Needs drying after every wet use to avoid mildew
- Not a substitute for a weather-sealed body and lens in sustained heavy rain
Compared with the MOSISO and CADeN backpacks
The backpacks protect the camera while it is packed; this cover protects it while it is being used, which is the harder problem. The two are complementary rather than competing — a water-resistant backpack plus a rain sleeve covers transport and shooting. If you can only buy one protective item this year and you shoot outdoors on a schedule, the sleeve is the more urgent purchase, because a camera in a bag is not getting wet but it is also not taking photographs.
6. MOSISO Camera Backpack, DSLR/SLR/Mirrorless Photography Camera Bag – Best for Commuting and Day Trips
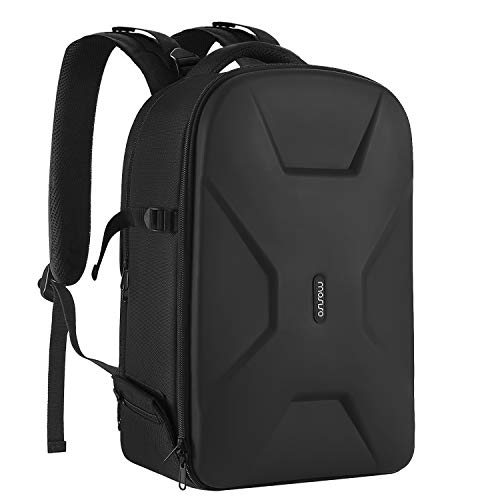
MOSISO Camera Backpack, DSLR/SLR/Mirrorless Photography Camera Bag
Included for 'Best DSLR Camera Deals' because the listing specifies DSLR/SLR/Mirrorless Photography Camera Bag, details this guide uses to compare options.
View on AmazonThe MOSISO camera backpack is aimed at the photographer who is also carrying a life: a laptop, a charger, a water bottle, a jacket. It holds a DSLR or mirrorless body with lenses in padded, adjustable compartments and carries the rest of a working day alongside. It suits commuters who shoot on the way to and from work, students, and anyone doing day trips where the camera is one item on a longer list.
Key specs
- Form: backpack with a dedicated padded camera compartment
- Compatibility: DSLR, SLR and mirrorless bodies; dividers adjust for different body and lens sizes
- Laptop sleeve: typical of this backpack class — confirm the stated maximum screen size on the listing
- Access: main compartment plus side access on most models in this class; check the specific configuration
- Materials: water-resistant synthetic shell with padded back panel and shoulder straps
- Best for: one body, two to three lenses, small accessories, a laptop and personal items
Why the laptop sleeve decides the category
A camera backpack without a laptop sleeve is a camera bag. A camera backpack with one is the only bag some people need. That distinction matters more than any material specification, because it determines whether the bag replaces a second bag or adds to it. If you are carrying a camera and a laptop, a backpack with both compartments is the difference between one item on your shoulders and two.
Backpack ergonomics
Weight distribution is the reason to choose a backpack over a sling. Two shoulder straps plus a back panel spread a load across the whole torso rather than one shoulder, and a sternum strap stops the bag shifting when you bend. The limits are predictable: a backpack has to come off to be opened, it is slower in crowds, and it takes up more space on public transport. For commuting and day trips those limits rarely matter; for street photography they often do.
Packing and protection
Dividers are the protection system, and they work only if they are arranged for your specific kit rather than left in the factory layout. The right approach is to build a compartment around each body and lens so nothing can slide, then fill any remaining gap with a divider rather than a loose item. Keep heavy items closest to your back, because that is where the load is best carried. Keep the camera body at the top if your bag has top access, and check that the bag stands upright when loaded — a bag that tips over puts your lens on the pavement.
Ownership realities
The failure points on a soft backpack are consistent across brands. Zips and zip pulls go first, then the internal lining at the corners where dividers press against it, then the padding at the shoulder straps. Shell fabric and water resistance hold up well for years. The most common mistake is over-loading: a bag filled beyond its design capacity puts stress on the zip and the strap stitching, and it stops being comfortable long before it stops being physically full. Wash a synthetic camera backpack by hand with mild soap and let it dry fully open; machine washing destroys the padding structure.
Pros
- Carries a camera kit and a laptop in one bag
- Two-shoulder carry distributes weight far better than a sling
- Adjustable padded dividers accommodate different body and lens combinations
- Water-resistant shell handles light rain and damp ground
- Padded back panel and straps suit long commutes
- Premium tier build for daily use
Cons
- Must be removed to access the camera, unlike a sling
- Bulky in crowds and on crowded transport
- Zips and internal lining are the first components to wear
- Over-loading damages zips and strap stitching
- More bag than you need if you never carry a laptop
Compared with the CADeN backpack
Both are premium-tier camera backpacks, and the split is about how much kit you carry. The MOSISO design is oriented toward the everyday carry case — camera plus laptop plus personal items. The CADeN backpack is oriented toward larger kits, longer trips and tripod carry. If your camera is one item among several, MOSISO is the better fit. If the camera is the main event and everything else supports it, the CADeN layout will suit you more. Neither is a wrong answer; they are sized for different days.
7. CADeN Camera Backpack Bag Professional for DSLR/SLR Mirrorless Camera Waterproof – Best for Larger Kits and Air Travel

CADeN Camera Backpack Bag Professional for DSLR/SLR Mirrorless Camera Waterproof, Camera Case Compatible for Sony Canon Nikon
Included for 'Best DSLR Camera Deals' because the listing specifies Camera Case Compatible for Sony Canon Nikon, details this guide uses to compare options.
View on AmazonThe CADeN backpack is the bag for photographers whose camera kit is the point of the trip rather than a passenger on it. It is built around a padded, divided camera compartment, carries a laptop, and is designed to be compatible with common DSLR and mirrorless body sizes. It suits travelling photographers, event shooters who carry two bodies, and anyone who has outgrown a small shoulder bag and wants one bag that does the whole job.
Key specs
- Form: professional-style camera backpack with divided, padded compartment
- Compatibility: DSLR, SLR and mirrorless bodies in common sizes
- Weather claim: water-resistant / waterproof construction claim on the shell
- Laptop compartment: present on this class of bag; confirm the maximum screen size on the listing
- Tripod carry: most professional backpacks in this class include side straps or a base strap for a tripod
- Best for: two bodies, three to four lenses, flash, accessories, laptop and tripod
Capacity and the tripod question
The reason to move up to a professional backpack is usually a tripod. A tripod cannot go inside a bag with a camera safely, so it has to be carried externally, and external carry needs proper straps and a reinforced base. The second reason is a second body: two bodies plus two mounted lenses takes up roughly twice the padded volume of a single-body kit, and bags sized for one body simply do not stretch to two. If either of those applies, a professional backpack is the right category.
Air travel
Camera gear is the one thing most photographers refuse to check, which makes cabin fit the practical specification. Measure your airline’s maximum cabin dimensions rather than relying on a bag’s stated capacity, and remember that a fully packed professional backpack is heavy — several kilograms of camera, lens and laptop will be near the practical carry limit on many carriers. A bag that fits the sizer but weighs too much is still a problem at the gate. Weigh the loaded bag at home before a trip, and move anything non-essential to checked luggage.
Ownership realities
Professional backpacks take more abuse than small bags, and the wear pattern reflects that. Exterior fabric scuffs and eventually abrades where it rubs against airport trolleys and car boots. Base panels take the worst of it, which is why a reinforced, wipe-clean base is worth looking for. Shoulder strap foam compresses with heavy loads faster than with light ones. Dividers lose their stiffness after a couple of years and stop holding shape. None of these are reasons to avoid a large backpack; they are reasons to check the base, the stitching at the strap anchors, and the zip quality before you buy.
Pros
- Carries a large kit: two bodies, several lenses, flash and accessories
- External tripod carry is a core part of the design
- Water-resistant shell handles rain and damp ground
- Laptop compartment makes it a single-bag travel solution
- Padded, adjustable dividers accommodate a changing kit
- Premium build suited to frequent travel
Cons
- Large and heavy when fully loaded
- Can approach airline carry-on weight limits before it approaches size limits
- Overkill for a one-body, one-lens shooter
- Base panel and exterior fabric are the first wear points
- Camera access requires removing the bag
Compared with the K&F CONCEPT sling bag
These are opposite ends of the same decision. The sling keeps one body instantly available and nothing else; the CADeN backpack carries everything and gives up instant access to do it. The useful question is not which is better but which day you are having: a two-hour walk with one lens favours the sling, a wedding, a flight or a landscape trip with a tripod favours the backpack. If you are buying your first camera bag for a DSLR deal, buy for the majority of your outings rather than the most ambitious one.
8. WANBY Camera Strap Canvas Black Shoulder Strap with Quick Release Buckles – Best Budget Classic Strap
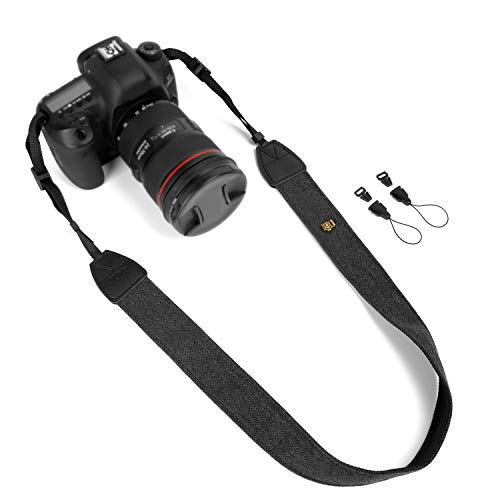
WANBY Camera Strap Canvas Black Shoulder Strap with Quick Release Buckles
Included for 'Best DSLR Camera Deals' as a relevant option in this category; details come from the product listing.
View on AmazonThe WANBY strap is the simple answer to a simple problem. It replaces the uncomfortable factory strap with a canvas shoulder strap with quick-release buckles at the ends, in black, at a budget tier. It suits photographers who want a low-cost, no-fuss strap, people buying a second strap for a backup body, and anyone who prefers a classic look over technical hardware.
Key specs
- Type: canvas shoulder / neck strap
- Release: quick-release buckles at the strap ends
- Colour and material: black canvas webbing with metal or polymer hardware
- Fit: standard DSLR strap lugs; check whether your body uses fixed lugs or split rings
- Load class: best suited to APS-C bodies and lighter full-frame setups with a standard zoom
- Best for: everyday neck carry, backup bodies, a second strap for a second camera
What canvas does well
Canvas is comfortable against a shoulder in a way that thin nylon webbing is not. It grips slightly, so the camera does not slide down your chest when you lean forward, and it softens with use rather than staying stiff. It is also cheap to produce, which is why budget straps use it. The trade-off is drying time — canvas holds water after a wet shoot and takes hours to dry, unlike synthetic webbing.
Quick-release buckles at the ends
Buckles at the strap ends mean the strap can be removed from the camera without unthreading it, which is convenient for storage and for switching straps between bodies. It is not the same as a quick-release system at the body end: the strap still hangs around your neck when the camera is on a tripod. That is a meaningful difference for tripod-heavy shooters, and it is the main functional gap between this strap and the waka design.
Ownership realities
On a strap of this type, three things wear. Webbing frays first at the point where it passes through the lug, because that is where it bends and rubs against metal every time the camera moves. Buckle springs weaken, which is why a buckle that used to click now needs a push. And the stitching at the buckle attachment is a single point of failure — check it periodically by looking for loose or broken threads. Straps are inexpensive enough that replacement is normal, but a strap failure drops a camera, so the check is worth thirty seconds a month.
Pros
- Budget tier price with no meaningful compromise on basic function
- Canvas is comfortable, grippy and softens with use
- Quick-release buckles make removal and strap swapping easy
- Neutral black finish suits any body
- Good second strap for a backup camera
Cons
- No safety tether — the buckle is the only connection to the camera
- Canvas absorbs water and dries slowly
- Less padding than a technical strap for heavier bodies
- Buckles hang around the neck when the camera is on a tripod
- Webbing and stitching need periodic inspection
Compared with the waka strap
The waka strap is the technical version of the same idea: a quick release at the body end, a safety tether, and a sliding padded shoulder section. It costs more and adds hardware bulk. The WANBY strap is the better purchase if the camera is light, if you rarely use a tripod, or if you are buying for a second body you use occasionally. The waka strap is the better purchase if you shoot regularly with a heavier lens, or if a strap failure would be a serious loss.
9. MBJRFU Camera Lens Cleaning Kit – Best for Routine Maintenance

Camera Lens Cleaning Kit - Mirrorless and DSLR Camera Cleaning Kit, Including Lens Paper/Blower, Cotton swabs, dust Free Cloth, Lens Pen, Cleaning Brush
Included for 'Best DSLR Camera Deals' because the listing specifies Mirrorless and DSLR Camera Cleaning Kit and Including Lens Paper/Blower, details this guide uses to compare options.
View on AmazonThe least glamorous item in this guide is also the one that protects the most expensive thing you own. A cleaning kit with lens paper, an air blower, cotton swabs and a cleaning solution covers the routine maintenance that keeps a DSLR working: dust off the front element, fingerprints off the rear element, dust out of the mirror box, and



Write Your Review
No reviews yet. Be the first to share your experience!